How to use the alien0-plugin
Prerequisites
To use the alien0-plugin you need an installed (and working) hive-framework on your platform (see Getting started in Documentation for more details).
Note that the plugin is only available in a source code package and thus you have to compile it in a Qt 4.3 environment (see readme.txt in the package).
Loading the plugin
To start working with alien0 you should load the plugin into hive. This step is only necessary for the first time. For all next runs hive will automatically load the appropriate plugin file(s).
1. Start hive.
2. Click on Settings -> Plugins in the menu bar.

3. Click on Load button and select the alien0-plugin file (in windows: alien0.dll). If the loading process succeeds the file name together with some additional informations will be listed in Loaded plugins.
4. Click on OK button to leave the dialog.
Setting up a simulation
A simulation in hive consist of nodes that are hierarchical organized in a tree, i.e. each node can be connected to other (child) nodes and has a unique parent node if it is not the root node itself. alien0 spreads parts of the simulation over the node tree where each node process the work in an own thread.
The root controls the whole simulation and has the potential to change the simulation parameters if necessary. The following step by step instruction shows how to create a simulation with one root node and two child node instantiated on one computer. More complex node topologies can be built analogous.
1. Click on Simulation -> New -> Root node in the menu bar.

2. Click on Root components.
3. Click on the alien0 checkbox in the top right field to select the plugin.
4. Check in the bottom right field all components that are listed.
5. Click on Node components and do the same thing like in 3. and 4.
6. Click on Framework -> Connection in the left slider field and set a appropiate socket address for the root (the default setting should work in the most cases).
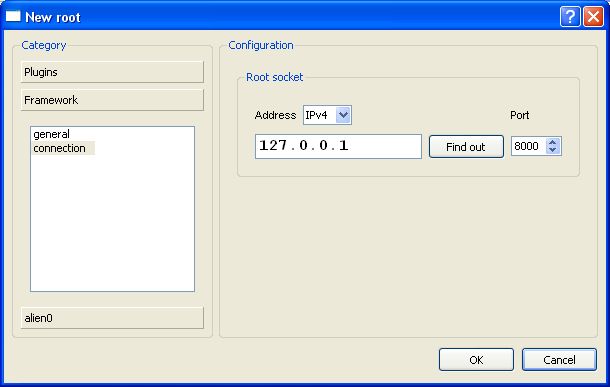
7. Click on OK button to instatiate a new root. A new window should emerge in the hive workspace.
8. Click on Simulation -> New -> Non-root node in the menu bar and then on Framework -> Connection.
9. Set a new node socket (eg. 127.0.0.1 Port: 8001) and the socket of the root node (127.0.0.1 Port: 8000 in standard settings).
10. Click OK button.
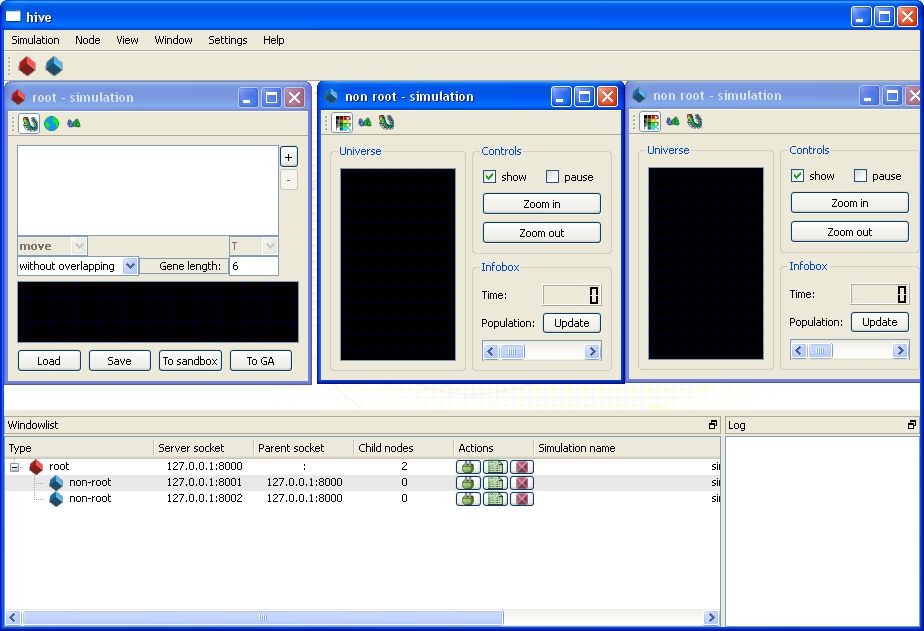
11. Do 8. - 10. again but choose a different socket (eg. 127.0.0.1 Port: 8002). Now you should have one root and two connected child nodes. You can check the connection state in the color of the plug symbol (in the window list on the bottom). A green color indicates that everything is ok.
Genetic algorithm
The most important feature in alien0 is the distributed genetic algorithm that uses all non-root nodes to evaluate individuals by simulating them in an alien universe. To start a new session please click on the globus icon in the root window (this brings you to the dispatcher component) and then on the New button.
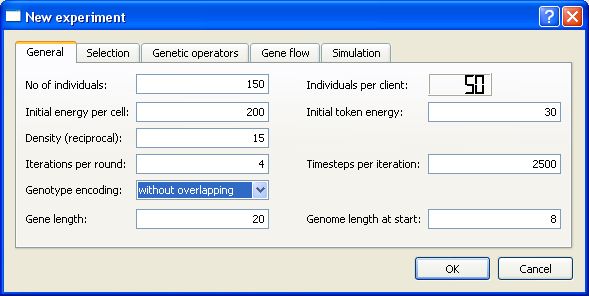
Now you can set all parameters for the GA. Most of the values are integers and some of them have reciprocal meaning, e.g. a universe density of 20 stands for a world where statistically one cell of an individual appears in 20 discrete space fields.
Many parameters are pretty much self-explanatory and the best way to understand them is to experiment with their values.
Warning: Some values leads to senseless meanings (for instance a universe with zero density) and can cause a crash of the whole program since all parameters are checked only very roughly in this alpha version.
It is also possible to change the GA parameters afterward (useful for simulating gene drifts).
Monitoring and tracking system
alien0 offers a GA evaluation monitor (or genepool monitor) and a dynamic tracking system for individuals. The genepool monitor is available for both server and client nodes. By clicking on the ![]() icon, you will see a table with all generated individuals. This table is empty as long as you click on "Update". Subsequently, the table will be filled with useful information such as "Fitness", "Size", "Attacked/created cells", "Gene fitness" and "Id".
icon, you will see a table with all generated individuals. This table is empty as long as you click on "Update". Subsequently, the table will be filled with useful information such as "Fitness", "Size", "Attacked/created cells", "Gene fitness" and "Id".
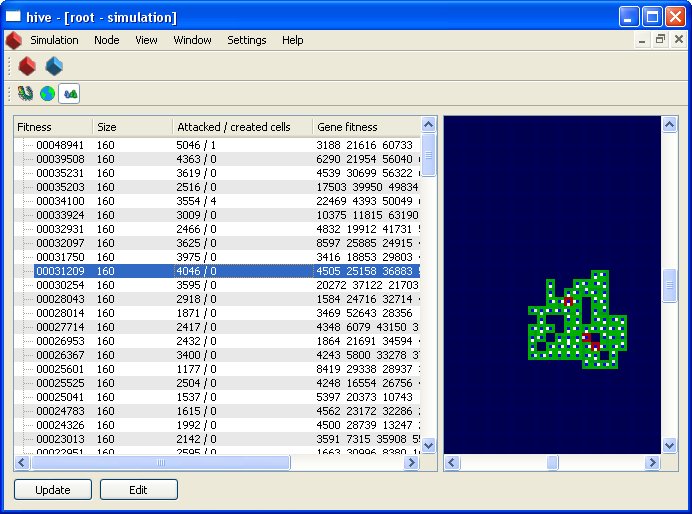
The "attacked cells" information is important to determine how aggressive an individual is while the fitness value measures the survivability for the GA. "Gene fitness" lists the fitness value for each gene and "Fitness" for the whole genome (which means the average of the fitness values of its genes). These informations are always based on the current generation when "Update" is clicked. Furthermore, each individual in each generation is associated with an id value. If you click on a row in the list you will see the spatial structure of the corresponding phenotype.
The tracking system uses the id value to list all individuals that are still present. It is located in every simulation widget ![]() on client side. When you click on "Update" you will see the list of individuals in the alien universe. To visually location one of them, you have to click on its row.
on client side. When you click on "Update" you will see the list of individuals in the alien universe. To visually location one of them, you have to click on its row.
![]()
Editing your own individual

